To content

Smartboard Quick Start Guide

  • A Smartboard is, among other things, a digital whiteboard whose board images can be saved as PDFs on USB sticks.
  • The Smartboard can serve as an extended screen for an end device (WindowsPC or Mac).
  • The paired Polycom (a video conferencing system) only works when an end device is connected to it. Instructions for the Polycom are available here.
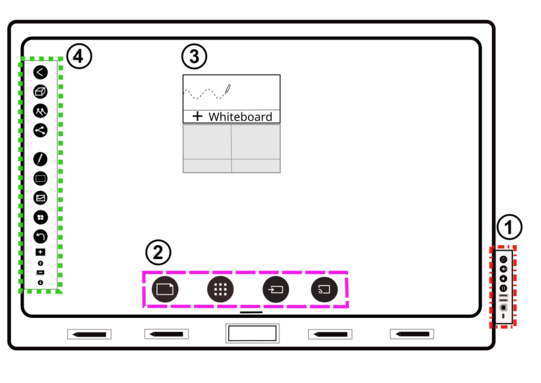
Pictogram of a smartboard. Black rectangle with rounded corners. Frame around it. Right outside of frame red framed box with vertical button bar. Labeled with number 1. In painting of Smartboard below, black icons framed in purple. Labeled with number 2. Above it a small rectangle with a pencil that draws a line and the inscription "+ Whiteboard". Labeled with number 3. Inside left smartboard edge green framed vertical icon bar. Labeled with number 4. © UB​/​TU Dortmund

Connection of a terminal device

  • To mirror the screen display of an end device on the Smartboard, both devices must be connected via HDMI cable.
  • To operate the end device via the Smartboard, both devices must be connected via USB and USB-B cable.


1) Device control panel
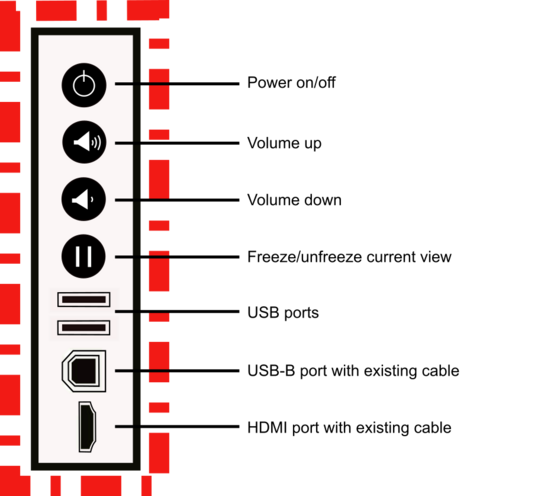
Labeled pictogram of the device control panel. 8 buttons and connectors placed one below the other. Framed in red. At the top, black button with white ring and label "Power on/off". Below that, black knob with white speaker symbol and three sound waves labeled "Volume up". Below that button with speaker and one sound wave with label "Volume down". Below that button with two parallel lines and label "Freeze/unfreeze current view". Below that two black rectangles with label "USB ports". Below that, black square with cut corners and label "USB-B port with existing cable". Below that, the same symbol, but elongated with caption "HDMI port with existing cable". © UB​/​TU Dortmund

2) Main menu

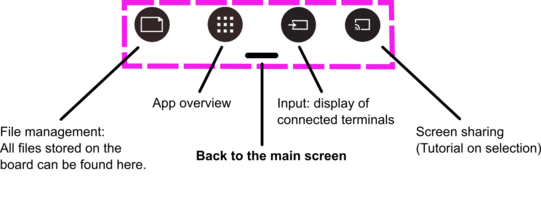
Labelled pictogram of menu bar. Four side by side black icons in purple frame. First icon is a white rectangle in black circle, labeled "File management: all files stored on the Smartboard can be found here." Next to it white dots in black circle labeled "App overview". Next to it, white rectangle with a line pointing into it in a black circle and labeled "Input: display of connected terminals." Next to it, white rectangle with WLAN icon in the lower left corner in a black circle with label "Screen sharing (Tutorial on selection)". Centered below icons black short line with caption "Back to the main screen". © UB​/​TU Dortmund

3) Whiteboard app

To write/draw, the whiteboard app must be opened on the main screen.

4) Writing and drawing on the smartboard
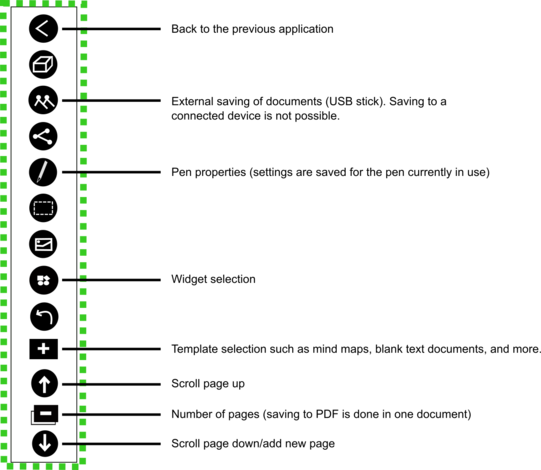
Labeled pictogram of the whiteboard functions. In green frame one below the other. At the top, a white smaller sign in black circle with label "Back to previous application". Two icons below are two white stick figures in a black circle with the caption "External saving of documents (USB stick). Saving to a connected device is not possible." Two icons below white pen in black circle with caption "Pen properties (settings are saved for the pen currently in use". Three icons below two circles and two rectangles in black circle with label "Widget selection". Two icons below white plus symbol in black rectangle with label "Template selection such as mind maps, blank text documents, and more". Below it white arrow pointing upwards in black circle with caption "Scroll page up". Below white minus symbol in black rectangle with caption "Number of pages (saving to PDF is done in one document". Below white arrow pointing down with caption "Scroll page down/add new page". © UB​/​TU Dortmund

Widgets

Widges are partly cross-board interactive tools. Tap the corresponding widget to select it.

To open the context menu of a widget, double-tap the widget.

Example of a widget context menu
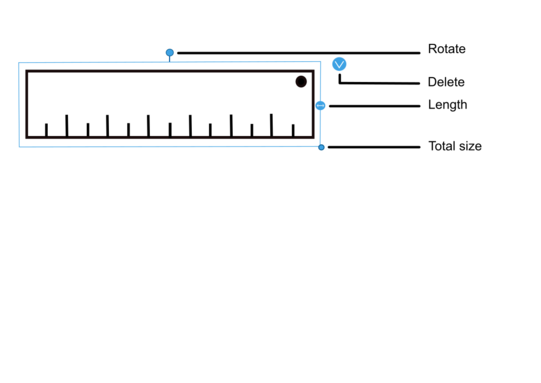
Labelled pictogram of a widget. Black and white ruler with light blue frame around it. At top of frame blue dot with label "Rotate". At frame blue dot with white arrow pointing down and caption "Delete". Right center of frame blue dot with label "Length". At the bottom right of the frame, a blue dot with the label "Total size". © UB​/​TU Dortmund